
NetBSD/macppc Partitioning HOW-TO
Preface
This document is broken into four main parts:
- Introduction (Understanding Partitions)
- Partitioning a disk
- Partitioning using Drive Setup (Mac OS 9)
- Partitioning using Disk Utility (Mac OS X)
-
Partitioning using
pdiskandnewfs(Mac OS 9, Mac OS X, Darwin, NetBSD, Linux)
- Creating a shared MS-DOS filesystem
- Partition nomenclature
Note: the Linux pdisk command does not properly set the
flags for NetBSD/macppc. If you have already partitioned your disk using
the Linux pdisk, you'll need to use the NetBSD pdisk to delete and re-create the NetBSD root and
swap partitions.
Introduction (Understanding Partitions)
This document describes in depth how to partition a disk for use with NetBSD/macppc and Mac OS. Whether you can boot your machine from a particular disk into a particular operating system depends on your machine's version of Open Firmware. The overall goal is to create an Apple Partition Map that Open Firmware can understand (and thus boot from) and that the NetBSD kernel can understand and use to find its root partition.
There are four tools to partition a disk: Apple's Drive Setup (Mac OS 9), Apple's Disk Utility (Mac OS X), NetBSD's pdisk(8) (all OSes), and NetBSD's disklabel(8) (NetBSD/macppc only). The first two tools (Drive Setup and Disk Utility) are distributed by Apple with Mac OS and are located on bootable Mac OS installation CDs. You can use them to partition a disk, create the filesystems, and to install Mac OS bootloaders (called disk drivers in Mac OS terminology).
The pdisk program is a command-line program which can be
compiled and run on most unix-like systems (particularly the ones that
run on PowerPC-based Macintosh and clone machines). This program can
only partition a disk -- it can't install bootloaders or create
filesystems.
NetBSD's disklabel creates a NetBSD-style
disklabel(5). Unlike the other three tools, it can only
create a fake Apple Partition Map (thus you can't use it to
create a disk that's bootable by Mac OS). That's OK, since
some versions of Open Firmware require you to use
disklabel to install the bootloader. Additionally,
disklabel is the partition tool that is used in
the NetBSD installer.
In the tables below, "yes" means the disk is bootable, "mount only" means that the OS can mount partitions on the disk, but cannot boot from it, and "no" means the OS can't mount partitions or boot from the disk.
Open Firmware 1.0.5 or 2.0.x:
| OS | Drive Setup | Disk Utility | pdisk |
disklabel |
| NetBSD | mount only | mount only | mount only | yes |
| Mac OS 9 | yes | yes | no | no |
| Mac OS X and Darwin | yes | yes | yes | no |
| Linux | yes | yes? | yes | no |
Open Firmware 2.4 or 3:
| OS | Drive Setup | Disk Utility | pdisk |
disklabel |
| NetBSD | yes | yes | yes | no |
| Mac OS 9 | yes | yes | no | no |
| Mac OS X and Darwin | yes | yes | yes | no |
| Linux | yes | yes? | yes | no |
The Apple Partition Map stores partition information as a numbered list (usually in order of location on disk). Partition "zero" is where the primary bootloader is stored for Open Firmware 1.0.5 or 2.0.x models. The partition map is partition number 1. A disk with Mac OS 9 will usually have partitions 2 thru 8 reserved for its drivers. The user defined partitions (HFS, HFS+, UFS, NetBSD, etc.) will start at partition 9 (Mac OS 9 disk), or 2 (no Mac OS 9).
Keep in mind that Open Firmware uses Apple Partition Map numbers when
determining the command to boot your machine into NetBSD/macppc. You can
use pdisk to print out the Apple Partition
Map, regardless of how it was created.
To make matters a little more confusing, NetBSD/macppc uses its own partition naming scheme, the letters 'a' thru 'h'. The root partition (regardless of its Apple Partition Map location) is partition 'a'. The swap partition is partition 'b'. Partition 'c' represents the whole disk. The '/usr' partition (if it exists) is partition 'g'. The rest of the partitions fill in the remainder of the letters.
See the section on Partition nomenclature below for a more thorough discussion.
There are a whole slew of filesystem types you may encounter. Briefly, HFS is Apple's old filesystem which has been in use since the '80s. HFS+ (also known as "extended") is an enhanced version of HFS which allows larger file (and filesystem) size, storage of unix-style owner and permissions. HFS+ is the recommended filesystem type for Mac OS > 8.1, including Mac OS X. UFS is Apple's NeXT-derived version of good old BSD FFS. MS-DOS (also known as FAT) is the filesystem standardized on the MS-DOS/Windows platform. BSD FFS is the standard filesystem used by most BSD unix-like OSes since the '80s (including NetBSD). ext2fs is the most common linux filesystem.
You may want to consider whether to include a partition that will be shared among your OSes. The most compatible format is MS-DOS FAT, but it lacks features (such as permissions and good repair tools). Unfortunately, NetBSD doesn't yet support the Macintosh HFS and HFS+ file systems natively. NetBSD-current has full support for Apple's UFS. Here's the quick breakdown:
| format | Mac OS 8.1-9.x | Mac OS X and Darwin | NetBSD | Linux |
| Apple HFS | yes | yes | hfstools | yes(1) |
| Apple HFS+ | yes | yes | no | read-only(2) |
| Apple UFS | no | yes | -current | read-only |
| MS-DOS FAT | File Exchange | yes | yes | yes |
| BSD FFS | no | no | yes | read-only |
| Linux ext2fs | no | yes(3) | yes | yes |
1 - Either use the stable hfsutils or the experimental in-kernel support.
2 - Either use the experimental hfsplus utils or the experimental linux-hfsplus kernel module.
3 - Use the highly experimental Ext2 Filesystem kernel extension.
If you want to create a partition you can share with Mac OS 9, you should create an HFS partition which you will later convert to MS-DOS format. See Creating a shared MS-DOS filesystem after you've partitioned your disk.
If you don't care about Classic Mac OS, then UFS is probably the best bet. Just make the UFS partition from within Mac OS X or Darwin, and make sure you are using a -current NetBSD kernel. UFS will be supported in the next major release of NetBSD (i.e. not the 1.6.x branch).
Partitioning will erase the contents of your drive, so back up everything from the disk you will be partitioning. Follow the instructions for the partitioning tool you wish to use.
- Partitioning using Drive Setup (Mac OS 9)
- Partitioning using Disk Utility (Mac OS X)
-
Partitioning using
pdiskandnewfs(Mac OS 9, Mac OS X, Darwin, NetBSD, Linux) - A
disklabel(8)is created by thesysinstinstaller when you follow the directions in the NetBSD 10.1 install notes.
Partitioning using Drive Setup (Mac OS 9)
-
You will need to use Drive Setup version 1.8.1 or later. This is the version that comes with Mac OS 9.0. If you are unsure, you need to select Drive Setup and pick
Get Infofrom theFilemenu.
If you have an older version of Mac OS, you can download either the Mac OS 9.0.4 (12.2 MB), Mac OS 9.1 (71 MB), Mac OS 9.2.1 (82 MB), or Mac OS 9.2.2 (21.3 MB) updates, all of which include a version of Drive Setup that works for us. Note, these are big Mac OS updates, so you will have to download a multi-megabyte disk image just to get the 500 KB Drive Setup application. Apple has not provided a recent version of Drive Setup as a standalone update.
Also, the Darwin installer has a version of Drive Setup that works. Darwin is also enormous (120.7 MB), since it contains a complete operating system.
You'll need to open the disk image and copy Drive Setup to a hard drive, RAM disk, Zip disk, or floppy disk (it can't run from the disk image).
-
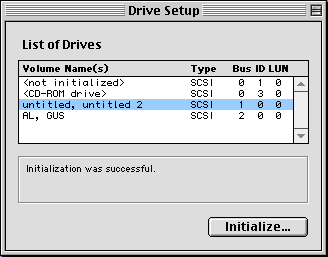
When you first run Drive Setup, it'll give you a screen like this, where you can select the drive that you want to re-partition.
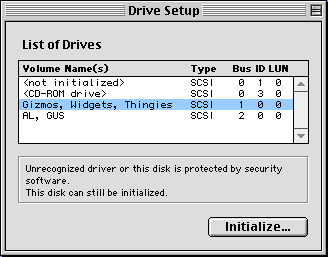
Select the drive to re-partition and click the
Initialize...button. This will open another dialog box. Click theCustom Setup...button.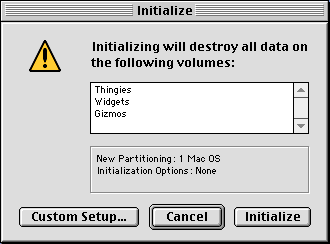
-
Select the number of partitions you'll be using. You will probably need at least 5 partitions, see the INSTALL notes for suggestions.
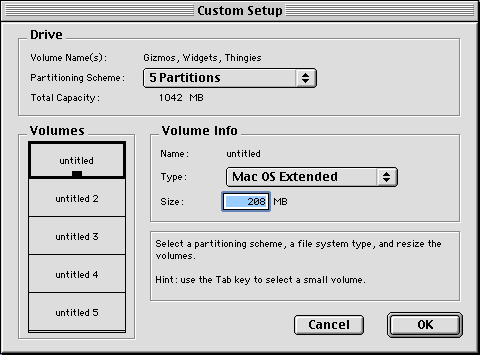
Pick the
Partitioning Schemefirst since you lose all of yourVolumesinfo each time you chose a different number of partitions. -
For each of the
Volumesset theType:under theVolume InfoandSize:as suggested in the INSTALL notes.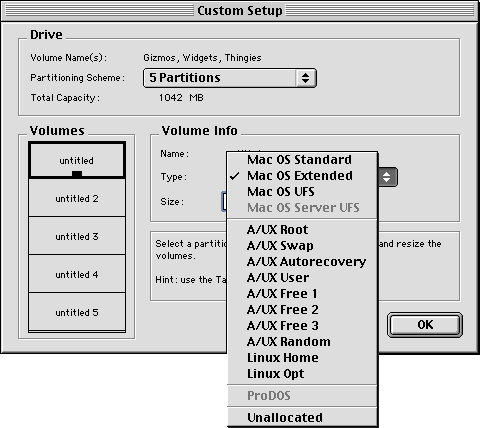
You can use the
TABkey to rotate through theVolumes. -
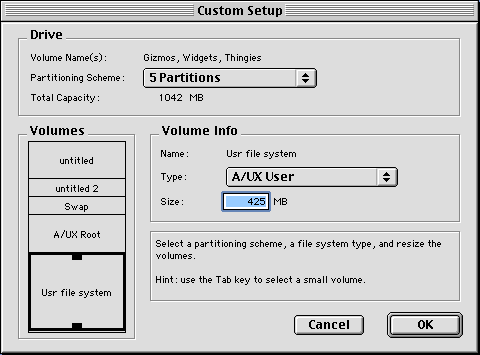
When you're done, you should have something like the following (you get to name the Mac OS partitions later from the Finder):
-
Click the
OKbutton. It will request confirmation of the changes.This is the point of no return! If you accept the changes, it will erase all contents of your drive
-
After it's done partitioning and creating the HFS(+) partitions, it will return to the original screen.
Note: the
A/UXpartitions are not accessible to Mac OS. -
You can quit Drive Setup, you're done with it. Now, from the Finder, you can rename your HFS(+) partitions. If you are using an Open Firmware 1.0.5 or 2.0.x model, you're done -- continue with the INSTALL notes.
If your model has Open Firmware 2.4 or 3, and you're going to make this disk bootable for NetBSD, you still need to do one more step.
You will need to copy
ofwboot.xcf(the bootloader) andnetbsd.GENERIC_MD.gzornetbsd.ram.gz(the installer) to one of the HFS(+) partitions on your drive. Make sure that you have downloaded these files inbinarymode.
Partitioning using Disk Utility (Mac OS X)
The Mac OS X Disk Utility program cannot directly create NetBSD partitions, but where there's a will, there's a way. The advantage of Disk Utility is that it is available from the Mac OS X install CDs. Disk Utility can only create "Mac OS Extended" (HFS+), "Mac OS Standard" (HFS), "UNIX File System" (UFS), and "Free Space" partitions.
NetBSD/macppc -current kernels can use UFS partitions, even as the root partition. At present, if there are no normal NetBSD A/UX-style partitions available, NetBSD/macppc does not fall back to assuming that an UFS partition is the root. You may need to figure out what partition NetBSD thinks the UFS is at (e.g. "e") and create a kernel with the UFS partition specified as the root device.
If this doesn't suit your needs, then you can use Disk Utility to
create your Mac OS HFS+ partitions and leave free space for NetBSD.
You'll need to use pdisk to create the
NetBSD partitions.
-
Launch Disk Utility. From the install CDs, it's under the "Install" menu. From Mac OS X, open /Applications/Utilities/Disk Utility.
-
You may need to authenticate. If it says "Click the lock to make changes." in the lower left corner of the window, click the lock and type in your password (you are using an administrative account, aren't you).
-
Select the disk to partition in the left panel. Click on the "Partition" tab. Pick your "Volume Scheme" (i.e. the number of partitions you want).
-
Set the names, formats, and sizes of your partitions. Hint: to make partitions smaller than it recommends, type a number into the size box and hit enter to get it to accept your partition size. "Mac OS Extended" HFS+ partitions have a minimum size of 4 MB. For example, on my two-partition disk (a small HFS partition for
ofwboot.xcfand a large UFS partition for NetBSD), Disk Utility looks like this: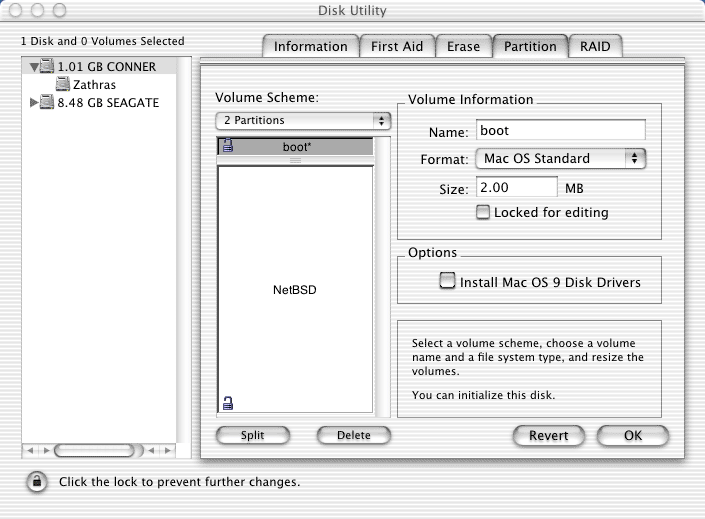
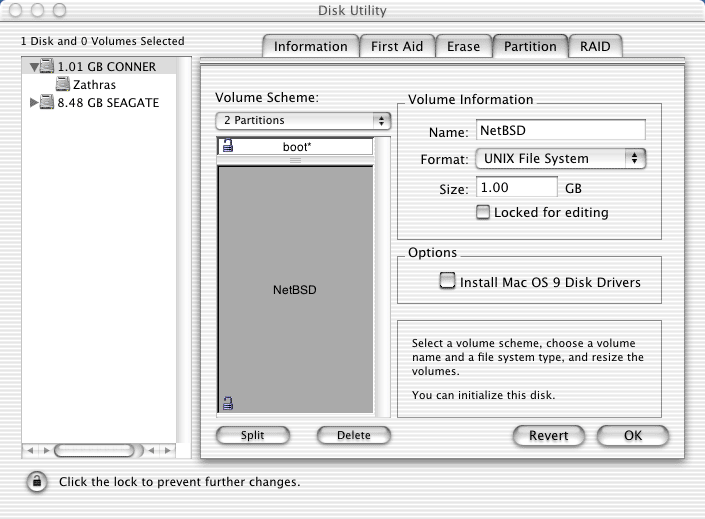
-
Choose whether to install Mac OS 9 disk drivers. This is your only opportunity if you think you'll ever want to access any partitions on this disk from Mac OS 9 or earlier. Even HFS partitions are inaccessible from Mac OS 9 if you don't click this button.
-
Click OK and follow through.
-
You can quit Disk Utility, you're done with it. Now, from the Finder, you can rename your HFS(+) and UFS partitions. If you are using an Open Firmware 1.0.5 or 2.0.x model, you're done -- continue with the INSTALL notes.
If your model has Open Firmware 2.4 or 3, and you're going to make this disk bootable for NetBSD, you still need to do one more step.
You will need to copy
ofwboot.xcf(the bootloader) to one of the HFS(+) partitions on your drive. Copynetbsd.GENERIC_MD.gz(the installer) to your UFS partition (though it can also sit on an HFS(+) partition). Make sure that you have downloaded these files inbinarymode.Remember, you'll need a -current kernel to use UFS as a root partition, and it may not be recognized by NetBSD as partition "a".
Partitioning using pdisk and newfs (Mac OS 9, Mac OS X, Darwin, NetBSD, Linux)
The command-line pdisk utility is used to view and modify the
Apple Partition Map on a disk. NetBSD, Mac OS X, and Darwin can all mount
disks partitioned with pdisk. Mac OS 9 and earlier need special
drivers to be installed to mount a disk (see Drive
Setup and Disk Utility). pdisk
can create partition maps which will be bootable on Open Firmware 2.4 or
3 machines running NetBSD, Mac OS X, and Darwin.
You may still find pdisk useful to modify a partition map
created by another utility or simply to list the partition map of a disk.
If you are merely interested in listing the partition map of a disk,
follow steps 1 through 4.
Before starting, some caveats about partitioning:
-
If you create the partition map from
pdisk(not just modify a partition map created using a Mac OS utility), you won't be able to access the partitions on this disk from Mac OS 9 and earlier. -
You can't create NetBSD A/UX-style partitions using the native Mac OS X, Darwin, or Linux
pdiskprogram. -
The Mac OS 9
pdiskis a little out of date, and may act slightly different than the stuff below, but it still does the job. -
Mac OS X and Darwin won't let you write the
pdiskpartition map onto a drive that is currently in use. This means you can't repartition your boot drive. Boot from another disk (or create a bootable CD using a tool like BootCD).
The partition numbers listed by pdisk
are the same that Open Firmware uses. If you're trying to boot an Open
Firmware 2.4 or 3 machine with this disk, remember which
Apple_HFS partition number has ofwboot.xcf and which
Apple_UNIX_SVR2 or Apple_UFS partition is your NetBSD
root partition.
-
Get
pdisk.-
NetBSD -current,
/sbin/pdisk -
NetBSD 1.6.x, ftp://ftp.NetBSD.org/pub/NetBSD/arch/macppc/netbsd-pdisk/netbsd-pdisk.macppc-1-6
# chmod 755 netbsd-pdisk.macppc-1-6 -
Mac OS X 10.2.5 (known to also work on Mac OS X 10.1.5), ftp://ftp.NetBSD.org/pub/NetBSD/arch/macppc/netbsd-pdisk/netbsd-pdisk.macos-10-2
# chmod 755 netbsd-pdisk.macos-10-2 -
Mac OS 9, ftp://ftp.NetBSD.org/pub/NetBSD/arch/macppc/macos-utils/pdisk.sea.hqx
Uncompress the archive, and run
pdisk ppc -
Everything else (Mac OS X, Darwin, Linux), ftp://ftp.NetBSD.org/pub/NetBSD/arch/macppc/netbsd-pdisk/netbsd-pdisk.src.20030424.tgz
# tar xzf netbsd-pdisk.src.20030424.tgz
# make
-
-
Determine the device name for the disk you're going to repartition or view. If you are repartitioning, unmount any of those disk's partitions that might be mounted.
-
NetBSD:
# dmesg | grep \[sw\]d\[0-9\]
# umount /mountpoint
-
Mac OS 9:
Drag the disk to the trash. Open
pdisk ppcand typeLto list the disks, their fake names, and their partitions -
Mac OS X and Darwin:
# /usr/sbin/diskutil list
# /usr/sbin/disktool -u disk2
-
Linux:
# dmesg | grep \[hs\]d\[a-g\]
# umount /mountpoint
-
-
Run
pdisk /dev/disk-device, where disk-device is something like:- NetBSD
/dev/sd2c(use the "c" partition) - Mac OS X and Darwin
/dev/disk2(use no partition designation) - Linux
/dev/hdc(use no partition designation)
  # ./pdisk /dev/disk2
  Edit /dev/disk2 -
  Command (? for help): ?
  Notes:
    Base and length fields are blocks, which vary in size between media.
    The base field can be <nth>p; i.e. use the base of the nth partition.
    The length field can be a length followed by k, m, g or t to indicate
    kilo, mega, giga, or tera bytes; also the length can be <nth>p; i.e. use
    the length of the nth partition.
    The name of a partition is descriptive text.

  Commands are:
    C    (create with type also specified)
    c    create new partition (standard unix root)
    d    delete a partition
    h    help
    i    initialize partition map
    n    (re)name a partition
    P    (print ordered by base address)
    p    print the partition table
    q    quit editing
    r    reorder partition entry in map
    s    change size of partition map
    t    change a partition's type
    w    write the partition table
- NetBSD
-
Double-check you're on the right disk. If it's already got an Apple Partition Map, everything should be OK.
  Command (? for help): P

  Partition map (with 512 byte blocks) on '/dev/disk0'
   #:                type name             length   base    ( size )
   1: Apple_partition_map Apple                63 @ 1
   2:      Apple_Driver43*Macintosh            56 @ 64
   3:      Apple_Driver43*Macintosh            56 @ 120
   4:    Apple_Driver_ATA*Macintosh            56 @ 176
   5:    Apple_Driver_ATA*Macintosh            56 @ 232
   6:      Apple_FWDriver Macintosh           512 @ 288
   7:  Apple_Driver_IOKit Macintosh           512 @ 800
   8:       Apple_Patches Patch Partition     512 @ 1312
   9:          Apple_Free                     192 @ 1824
  10:           Apple_UFS shared          1700000 @ 2016    (830.1M)
  11:           Apple_HFS macos            408788 @ 1702016 (199.6M)
  12:          Apple_Free                       8 @ 2110804

  Device block size=512, Number of Blocks=2110812 (1.0G)
  DeviceType=0x0, DeviceId=0x0
  Drivers-
  1:  23 @ 64, type=0x1
  2:  36 @ 120, type=0xffff
  3:  21 @ 176, type=0x701
  4:  34 @ 232, type=0xf8ff
If the disk does not have an APM, it'll give you some errors and you'll need to initialize the APM before creating new partitions.
  Command (? for help): P
  No partition map exists
  Command (? for help): i
  read failed
  Command (? for help): P

  Partition map (with 512 byte blocks) on '/dev/rdisk2'
   #:                type name    length   base    ( size )
   1: Apple_partition_map Apple       63 @ 1
   2:          Apple_Free Extra  2110749 @ 64      (1.0G)

  Device block size=512, Number of Blocks=2110812 (1.0G)
  DeviceType=0x0, DeviceId=0x0
-
Delete unused partitions and create your partitions. There's no need to delete the
Apple_Freepartitions, those automatically take up any unassigned space.Use the
Pcommand to list the partitions to make sure you delete the right one(s).Command (? for help): d Partition number: 9
Useful partition types you might want to create are:
Apple_HFSHFS and HFS+ partitions (also shared MS-DOS) Apple_UFSUFS partitions Apple_UNIX_SVR2A/UX-style partition for NetBSD and Linux Command (? for help): C First block: 2p Length in blocks: 100m Name of partition: Zathras Type of partition: Apple_HFS Command (? for help): C First block: 3p Length in blocks: 800m Name of partition: netbsd Type of partition: Apple_UNIX_SVR2 Available partition slices for Apple_UNIX_SVR2: a root partition b swap partition c do not set any bzb bits g user partition Other lettered values will create user partitions Select a slice for default bzb values: a Command (? for help): C First block: 4p Length in blocks: 4p Name of partition: swap Type of partition: Apple_UNIX_SVR2 Available partition slices for Apple_UNIX_SVR2: a root partition b swap partition c do not set any bzb bits g user partition Other lettered values will create user partitions Select a slice for default bzb values: b Command (? for help): P Partition map (with 512 byte blocks) on '/dev/rdisk0' #: type name length base ( size ) 1: Apple_partition_map Apple 63 @ 1 2: Apple_HFS Zathras 204800 @ 64 (100.0M) 3: Apple_UNIX_SVR2 netbsd 1638400 @ 204864 (900.0M) S0 RUFS k0 / 4: Apple_UNIX_SVR2 swap 267548 @ 1843264 (130.6M) S1 SFS k0 (swap) Device block size=512, Number of Blocks=2110812 (1.0G) DeviceType=0x0, DeviceId=0x0
-
Write out the new partition map and quit.
  Command (? for help): w
  Writing the map destroys what was there before. Is that okay? [n/y]: y
  Command (? for help): q
-
Create new filesystems.
-
NetBSD can only create its own filesystem (FFS) for the root and user partitions. It can't directly create UFS, HFS, HFS+, or non-floppy sized MS-DOS filesystems. You can use hfstools to create an HFS filesystem.
# newfs /dev/sd2a
# hformat /dev/sd2e
-
Mac OS 9 will ask to create HFS and HFS+ filesystems when you reboot. After the reboot, it will recognize the new partition map, notice those partitions don't have filesystems and ask to create them. See Creating a shared MS-DOS filesystem on how to format a shared MS-DOS partition.
-
Mac OS X and Darwin can create UFS, HFS+, and HFS filesystems. It can't create NetBSD FFS, or non-floppy sized MS-DOS filesystems using command-line utilities. You won't need an HFS (non-extended) partition unless you intend to use it with Mac OS 8.0 or earlier.
# newfs_hfs /dev/disk2s2(for HFS+)
# newfs /dev/disk2s5(for UFS)
-
Linux can only create its own filesystem (ext2fs) for the root, swap and user partitions and MS-DOS filesystems. It can't directly create UFS, HFS, or HFS+. You can use hfstools to create an HFS filesystem.
# mkfs -t ext2 /dev/hdc2
# mkdosfs /dev/hdc3
# hformat /dev/hdc5
-
-
Mount your new filesystems.
-
NetBSD (use the same commands for FFS and UFS):
# mount /dev/sd2a /mnt
# hmount /dev/sd2e
(virtual mount)
-
Mac OS X and Darwin:
# /sbin/autodiskmount -v ** /dev/rdisk2s2 FILESYSTEM CLEAN; SKIPPING CHECKS ** /dev/rdisk2s5 QUICKCHECK ONLY; FILESYSTEM CLEAN Mounted ufs /dev/disk0s5 on /Volumes/untitled DiskDev Type FileSys Fixed Write Volume Name Mounted On disk2s2 ??? hfs yes yes untitled /Volumes/untitled disk2s5 ??? ufs yes yes untitled /Volumes/untitled 1 disk0s10 ??? hfs yes yes OSX / -
Linux:
# mount -t ufs -o ufstype=44bsd,ro /dev/hdc1 /mnt/netbsd(BSD FFS)
# mount -t ufs -o ufstype=openstep,ro /dev/hdc2 /mnt/macosx(OSX UFS)
# hmount /dev/hdc3(virtual hfsutils mount)
# mount -t hfs /dev/hdc3 /mnt/macos(experimental in-kernel HFS)
# hpmount /dev/hdc4(virtual hfsplus utils mount)
# mount -t hfsplus -o ro /dev/hdc4 /mnt/macosx(experimental in-kernel HFS+)
# mount -t ext2 /dev/hdc5 /mnt/linux(linux ext2fs)
-
-
If you are using an Open Firmware 1.0.5 or 2.0.x model, you may want to copy
netbsd.GENERIC_MD.gz(the installer) to your FFS or UFS partition. Make sure that you have downloaded this file inbinarymode. You'll still need to loadofwboot.xcffrom another source to boot your machine, though.If your model has Open Firmware 2.4 or 3, and you're going to make this disk bootable for NetBSD, you will need to copy
ofwboot.xcf(the bootloader) to one of the HFS(+) partitions on your drive. From NetBSD, use thehcopycommand. Copynetbsd.GENERIC_MD.gz(the installer) to your FFS or UFS partition (though it can also sit on an HFS(+) partition). Make sure that you have downloaded these files inbinarymode.Remember, you'll need a -current kernel to use UFS as a root partition, and it may not be recognized by NetBSD as partition "a".
Creating a shared MS-DOS filesystem
You can create an MS-DOS format partition that works in all OSes such
that classic Mac OS will automatically mount it, and the unix-like OSes
(NetBSD, Linux, Darwin, and Mac OS X) can mount it using the
mount_msdos command. The steps below outline the most
straightforward technique.
-
Partition your hard drive with an HFS partition (type
Apple_HFS) reserved for MS-DOS. -
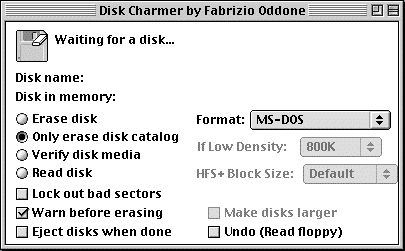
Next, boot Mac OS 8.1-9.x, grab a copy of Disk Charmer or DiskCharmer, and set it up to create an MS-DOS file system. Your settings should look something like this:
-
Drag the partition onto DiskCharmer's window and it will prompt you before erasing it and creating an MS-DOS file system in place of the HFS file system you created in the first step.
-
Now, when you boot Classic Mac OS, this partition will automatically mount using PC Exchange or File Exchange (depending on what it's called in your version of Mac OS).
When you boot into Mac OS X, Linux, or NetBSD, run the following command:
mkdir -p /msdos.filesystem;/sbin/mount_msdos -m 777 /dev/disk0s11 /msdos.filesystem
where
/msdos.filesystemis the mount point you'd like, and/dev/disk0s11is the device name for your partition. Alternatively, for NetBSD and Linux, you can add an entry to your/etc/fstabto always mount this filesystem. -
To get Mac OS X and Darwin to automatically mount your MS-DOS file system, you need to create a System Startup bundle. The SystemStarter HOWTO is a good reference if you want to learn more about creating your own startup bundles. There's probably a way to do this using
autodiskmount, but this technique works fine. The only downside is that the MS-DOS filesystem is unavailable to the Classic environment. Here's an example of what to do:-
# mkdir -p /Library/StartupItems/MountMSDOS -
Create
/Library/StartupItems/MountMSDOS/StartupParameters.plistwith the following contents:{ Description = "Mount MSDOS partitions"; Provides = ("Manual MSDOS partitions"); Requires = ("Disks"); OrderPreference = "None"; Messages = { start = "Mounting MSDOS partitions"; stop = "Unmounting MSDOS partitions"; }; } -
Create
/Library/StartupItems/MountMSDOS/MountMSDOSwith the following contents:#!/bin/sh . /etc/rc.common ## # Manually mount HFS partition with MS-DOS filesystem ## ConsoleMessage "Mount MS-DOS partitions" ## # Mount your filesystems manually. ## mount_msdos /dev/disk0s11 /Volumes/Thingies
-
# chown -R root /Library/StartupItems/MountMSDOS
# chmod a+rx /Library/StartupItems/MountMSDOS/MountMSDOS
-
Partition nomenclature
There are three partition identification schemes you'll run across when using NetBSD/macppc. Each identification scheme sorts the partitions differently, even though the partition's location on the disk doesn't change. Some schemes hide certain partitions.
-
Actual order on the disk (0 thru max partition number):
This is the scheme used by Open Firmware and the
/dev/diskXsYdevice files in Mac OS X and Darwin. The order of partitions is directly related to the order you selected in Drive Setup, pdisk, or the NetBSD partitioning tools. You can print out this list from any OS using pdisk.0 A special "partition" reserved for a primary bootloader. 1 The Apple Partition Map. 2 thru ~8 Reserved for Mac OS 9 drivers if the drive is formatted with a Mac OS tool. Otherwise, user created partitions. ~9 thru ~15 User created partitions, placed in order of their physical location on disk. -
Mac OS-visible partitions (by partition name in Finder):
While you may have created a bunch of partitions in Drive Setup, only those partitions visible to Mac OS will show up in the Finder.
The only partitions visible to Mac OS 9 and earlier are those formatted in HFS, HFS+, or MS-DOS formats. The only partitions visible to Mac OS X and later are those formatted in HFS, HFS+, UFS, and MS-DOS (not NetBSD's 4.2BSD FFS).
-
NetBSD-visible partitions (letters a thru h, as seen by
disklabel):NetBSD reorders the partitions such that things work out better for itself. The
fstypereported bydisklabel(8)is set by the Apple Partition Map flags, and does not depend on the actual type of filesystem on that partition (be it NetBSD FFS, Apple HFS, or MS-DOS). In particular, MS-DOS formatted partitions show up asHFSpartitions, if created using the method in Creating a shared MS-DOS filesystem.a Your "A/UX Root" partition, regardless of its order on the disk b Your "A/UX Swap" partition, regardless of its order on the disk c This is the entire disk (first sector to last sector) d-f First few non-A/UX partitions (usually the user HFS(+) partitions) g Your "A/UX User" partition (if present), regardless of its order on the disk h Additional non-A/UX partitions (usually user HFS(+) partitions)
So, for example the following is what Drive Setup created on my PowerBook (FireWire):
| Mac OS | OF/OSX | NetBSD | Comment | Apple Partition Map type | disklabel fstype |
| 0 | bootloader | ||||
| 1 | Partition map | Apple_partition_map Apple | unknown | ||
| 2 | Mac OS driver | Apple_Driver43*Macintosh | unknown | ||
| 3 | Mac OS driver | Apple_Driver43*Macintosh | unknown | ||
| 4 | Mac OS driver | Apple_Driver_ATA*Macintosh | unknown | ||
| 5 | Mac OS driver | Apple_Driver_ATA*Macintosh | unknown | ||
| 6 | Mac OS driver | Apple_FWDriver Macintosh | unknown | ||
| 7 | Mac OS driver | Apple_Driver_IOKit Macintosh | unknown | ||
| 8 | Mac OS driver | Apple_Patches Patch Partition | unknown | ||
| Untitled | 9 | d | Mac OS 9 boot partition | Apple_HFS untitled | HFS |
| Untitled 2 | 10 | e | Mac OS X boot partition | Apple_HFS untitled 2 | HFS |
| Untitled 3 | 11 | f | MS-DOS shared partition | Apple_HFS untitled 3 | HFS |
| 12 | a | NetBSD boot partition | Apple_UNIX_SVR2 A/UX Root | 4.2BSD | |
| 13 | b | NetBSD swap | Apple_UNIX_SVR2 Swap | swap | |
| 14 | g | unused disk space | Apple_Free Extra | unknown | |
| c | NetBSD whole disk | unused |
After installation, one of the HFS partitions, "Untitled" (which is
partition 9 to Open Firmware, and partition d to NetBSD) has
ofwboot.xcf, and one of the A/UX partitions (which is partition 12
to Open Firmware, and partition a to NetBSD) has my NetBSD kernel, so I use
the following command to boot:
boot hd:9,ofwboot.xcf hd:12
Back to NetBSD/macppc Port Page