|
Home |
»
Help |
License |
Download
|
You may use this tool for preparing floppy disks or ZIP media to boot NetBSD from. It takes a file called "a filesystem image" (usually with a ".fs" suffix) or a compressed variant thereof (usually with ".fs.gz" suffix) and writes it to a removeable medium. This is similar to formatting a disk with the "transfer system files" option checked.
This program has it's homepage at https://www.netbsd.org/~martin/rawrite32/, where you will also find it's full license terms, and source code. A short version of the license is reproduced below.
Details on howto invoke this utility and it's command line options are explained below.

|
This is a typical screen while working with Rawrite32. Please click on the parts of the screen you would like documentation on. Please note that the main menu will be hidden in normal operation, you can make it visible by typing ALT or F10.
The typical workflow is:
If you are using an ancient Win9x/Millennium version, you will only be able to write to floppy disks. |
The main menu (only visible after pressing F10 or ALT) contains no hidden gems - everything is available via other parts of the GUI, check especially the settings icon and the help icon.
Hash options shows a dialog to select hash values calculated when opening image files.
Sector skip shows a dialog to select the first sector written to the medium, or in other words: how many sectors to skip at the start.
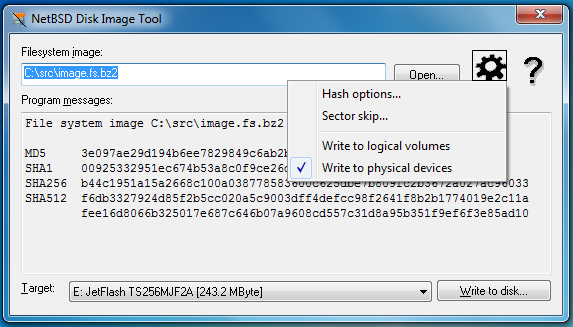
Right in this menu you can select the target device mode:
Note that ancient windows versions not based on Windows NT do not offer a generic access method for USB sticks, so you are restricted to logical volumes mode, and floppy disks as target drives.
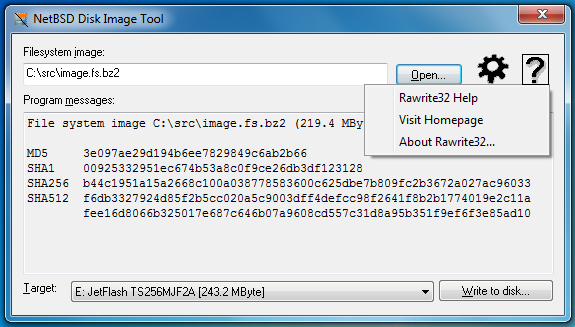
This menu contains references to this help, the official web site, and, most important, the "about" box.
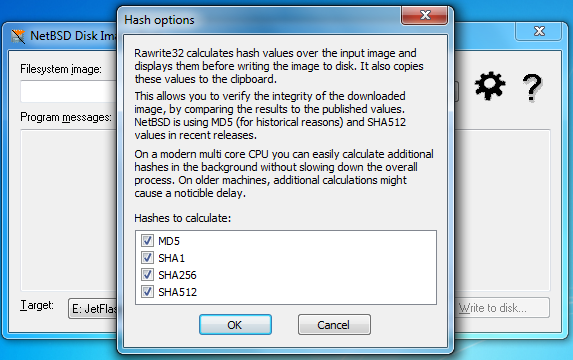 |
Hash values are used to ensure the integrity of a downloaded file. Basically they are strong cryptographic check sums over the input file. If you compare the values calculated by Rawrite32 (and copied to the windows clipboard) with the values published by the publisher of the disk image you have downloaded, you should be able to spot any alterations (due to network problems or manual tampering on mirrors). There are several "approved" algorithms, and one (MD5) used for historical reasons but considered "not quite safe" nowadays. You need to select the hash algorithms you find published values for your image for - for the NetBSD case, the default selection will deliver all the values you might need. If the sum for a strong algorithm (like SHA512) matches, there is no need to compare all the weaker results too. The hash options, by default, will fit your computers abilities, i.e. use the minimal useful set on slower/single CPU machines, and calculate all available hashes on multi core machines, where additional hash values will not cause a noticeable slowdown. |

Normally left blank, use only when following exact instructions telling you to enter some value here!
Some install media preparation process may involve copying multiple images to a media or leaving the first part of the media alone for other reasons (e.g. because it contains a partition table). This can be accomplished by entering the number of (512 Byte sized) sectors to skip at the start of the device here when writing the second (or later) parts of the contents.
If your intended target device is not listed here, check the target device mode in the settings menu. If you added the USB device after starting Rawrite32 it might not yet be listed - just quit and restart the program, after Windows tells you the device would be usable.
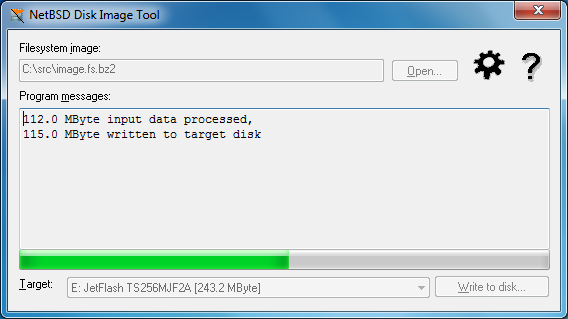 |
Progress during decompression/writing to target device is separated into input and output parts. Depending on the decompression and device writing speed, these values might get seriously out of sync. Since only the input size is deterministically known upfront, the progressbar only shows consumed input. |
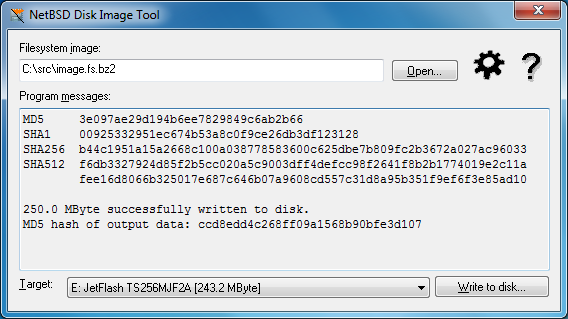 |
After output completed successfully, a (single, quick) hash value over all the output data will be displayed. This is more of a debugging feature for Rawrite32; whenever you have verified the input hash values, it would be impossible for somebody else to move things around or otherwise temper with your data. Note that the output hash is not a verification pass on the media, the values are calculated before passing the data to the device - it is not read again. |
You can also select the file in the windows explorer and drag&drop it onto the program.
Another option is to invoke the program from the command line, passing the file to write as it's parameter.
Copyright © 2000-2025 The NetBSD Foundation, Inc.
All rights reserved.
Copyright © 2000-2025 Martin Husemann <martin@NetBSD.org>.
Copyright © 2010 Izumi Tsutsui <tsutsui@NetBSD.org>.
Copyright © 2010 Quentin Garnier <cube@NetBSD.org>.
All rights reserved.
Usage of this program is free. Use it at your own risk.
If you would like to redistribute this program in any form, please see the full license for details.